Catalog Copy Cat
I have paged through the Idea Book and Catalog many times and each time it seems that I see something new. I have a lot of the samples circled to try to copy cat. It's no wonder that our catalog has been voted as the best for so many years! New to the catalog this year, are the textured impressions embossing folders set (pg 218) that gives you an embossed frame using a smaller sized embossing folder. If you've tried them, you know that they can leave a mark around your card stock where the outside edge of the folder is. Well, that's great if you've going to cut or tear around them, but doesn't look so hot when you're leaving it on the front of your card. I found the way to solve that with the advice of other demonstrators. I love the network available to us as demonstrators! It's like having a whole design team working with you!

Now, here's the way to keep the card stock from "denting" when you emboss it with the smaller folders. Use the Silicone rubber pad that you use for the Texturz plates! Using the multipurpose platform completely closed (no tabs open), insert a single layer of card stock into the folder. Lay the folder on top of the platform, place one standard Texturz Silicone Rubber Mat on top of the embossing folder, then top with ONE of the standard cutting pads (the clear pad that you sandwich with). I opened my card so that only one layer of the card stock was going through the Big Shot sandwich that I had created. If your punches reach to where you have your frame (mine didn't) you can punch out the center with the 1 3/8" square punch or the wide oval punch for the oval frame. I ended up cutting mine on my paper cutter, then trimming a little with the scissors which is where I lost the tiny extra edge around the middle. Oops! I wasn't going to waste a whole card, so just did without it. Of course the sample in the catalog is perfect, but not me...I just try to be! HA!
Give it a try and see what creations you can come up with! I have another scrap book page done and will share that with you tomorrow! See you then!

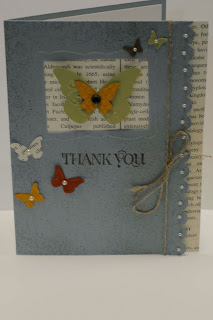
Ingredients: Stamp Set Curly Cute, Parlor Prints
Paper: Baja Breeze, Cajun Craze, More Mustard, Pear Pizzazz, Soft Sued, First Edition DSP
Ink: Baja Breeze, Early Espresso
Accessories: Big Shot, Designer Frames Embossing Folders, Soft Suede Marker, Color Spritzer Tool, Scallop Edge and 1/16" circle punches, Beautiful Wings Embosslits Die, Vintage Trinkets, Pearl Basic Jewels, Linen Thread, Dimensionals, Snail Adhesive
I spritzed the card front with the Soft Suede marker in the color spritzer tool. That's one tool that I really like, but so often forget about! The pearls are placed into the small punch hole that you make with the 1/16" circle punch along the scallop edge.And don't forget the inside!

Now, here's the way to keep the card stock from "denting" when you emboss it with the smaller folders. Use the Silicone rubber pad that you use for the Texturz plates! Using the multipurpose platform completely closed (no tabs open), insert a single layer of card stock into the folder. Lay the folder on top of the platform, place one standard Texturz Silicone Rubber Mat on top of the embossing folder, then top with ONE of the standard cutting pads (the clear pad that you sandwich with). I opened my card so that only one layer of the card stock was going through the Big Shot sandwich that I had created. If your punches reach to where you have your frame (mine didn't) you can punch out the center with the 1 3/8" square punch or the wide oval punch for the oval frame. I ended up cutting mine on my paper cutter, then trimming a little with the scissors which is where I lost the tiny extra edge around the middle. Oops! I wasn't going to waste a whole card, so just did without it. Of course the sample in the catalog is perfect, but not me...I just try to be! HA!
Give it a try and see what creations you can come up with! I have another scrap book page done and will share that with you tomorrow! See you then!
Happy Stampin'!
Lauri


Thank you for another card, also thank you for the instruction on how to avoid those extra lines. I am going to give it a try this afternoon.SA
ReplyDelete