And We're Off!
Off to the races of a new school year starting and getting everything organized for my first year! WOW! It could be overwhelming, if I'd let it, but have decided to just have fun with it and enjoy every moment. We had an open house at the school this weekend, and I was able to meet a few of my parents and students. It's going to be a great year!
I wanted to share some of the scrapbook swaps that I got at convention. I'm really glad I joined this swap! We each signed up for a specific month, so I have a whole year's worth of pages to just put pictures on. What a great way to get some scrapbooking done! Here's a couple of the months that I got, plus the page that I did (complete with pictures on it!).


I wanted to share some of the scrapbook swaps that I got at convention. I'm really glad I joined this swap! We each signed up for a specific month, so I have a whole year's worth of pages to just put pictures on. What a great way to get some scrapbooking done! Here's a couple of the months that I got, plus the page that I did (complete with pictures on it!).

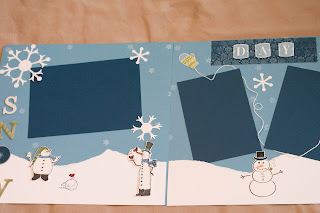
January... with such cute snowmen!

The letters are dimensioned up off the page and...

I love the mittens tied together with string on the second page.

February is all about love and glitz!


The boarder on the second page is done with the glimmer paper and has lots of sparkle!

It's hard to see in the photo, but she added paper piercing around the heart from the Essentials Paper Piercing Pack.You gotta love those new packs from the catalog and from the Holiday catalog.

March of course is green!

Love the punched and folded flower...

and the buttons and flowers on the second page.

Here's the page that I made...August! I had some fun pictures of my daughter, Katie and my grandkids, playing on the Slip and Slide.

The flowers were made from embroidery floss with punched brown centers, and the leaves added from the new Autumn Accents Die...one of my favorites from the new Holiday Catalog!

I added two dimensionals to the middle of the leaves to give them some shape.

Chevrons have been seen everywhere on scrapbooking pages, cards, and in clothing this year. I made these from the Polka Dot Parade DSP. The colors were perfect for a bright, summery page. I taught all of my classes how to make them and they really are easier than they look. Here's some simple instructions:
Cut the strips of paper 2"x 12" for this page.
With a pencil, ruler, and your grid paper, make a mark on the side of the paper that you don't want facing up, vertically dividing it in half at 1", then horizontally, make pencil marks every 1". I used a black marker on mine so that you could see the lines easier...these won't show when you get it all done.
With your paper snips, cut every other side on the horizontal mark to the center mark, like so...
Begin folding, always away from the slit that you have made, to form the point on each side, like this...
Then, just do the same on the other side, which will then make your Chevron shape.
I used just a little Snail Adhesive to hold the points down, then added them to my page. One of the gals in my scrapbook group, added dimensionals to hers and that really set them off. You can add them side by side as I did, or you could leave a space between them. They also are pretty when you weave a couple of them together, like this...
You could try different widths and lengths for them...how about cut 1" wide, with a mark every 1/2" across and down...you'd have a narrower one!
Have fun with different ways to add them to your page and let me see your ideas! Don't hesitate to contact me if you need a clarification on the instructions! I'd love to help you out! I'll be back tomorrow to share more of the pages that I swapped.
Have fun scrappin'!
Lauri


Comments
Post a Comment
I love to hear your comments! Thanks for stopping by!