Posts

Showing posts from 2011

Let's Go Fly a Kite

Image
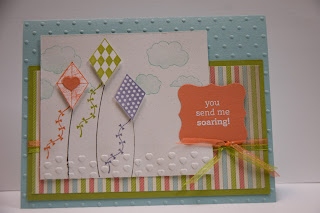
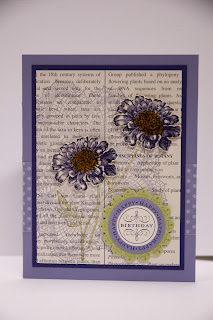
Let's go fly a kite, up to the highest heights...let's go fly a kite and send it soaring! Do you remember this song from Mary Poppins? It's been going through my head since I worked on cards yesterday with the new set from the upcoming mini catalog called Send Me Soaring. Another one of my favorites from the mini! Ingredients: Send Me Soaring Paper: Everyday Enchantment DSP, Pool Party, Lucky Limeade, Confetti White, Whisper White, Calypso Coral Ink: Early Espresso, Calypso Coral, Lucky Limeade, Pool Party, Wisteria Wonder, VersaMark Accessories: Perfect Polka Dots Embossing Folder, Adorning Accents Embossing Folder, White Embossing Powder, Heat Tool, Curly Label Punch, Big Shot, Dimensionals, Snail Adhesive, Everyday Enchantment Ribbon, Aqua Pen I love the different sayings in this set. You can use these cards for birthdays, get well, even a non traditional Valentine! I love the cheery colors and well, I just love this card! The ribbon and the DSP that I used are sneak

Field Flowers Happy Birthday

Image
I had to get out one of my favorite stamp sets yesterday to stamp with Nina....Field Flowers! We made  birthday cards and she made a special friend card for her best friend back in Indonesia. What fun to take something home that you made yourself!   Ingredients: Field Flowers, Hello Doily, Happiest Birthday Wishes (hostess set) Paper: Wisteria Wonder, Concord Crush, First Edition Specialty Paper, Very Vanilla, Lucky Limeade, In Colors Color Assortment Ink: Wisteria Wonder, Concord Crush, Old Olive, VersaMark Pad Accessories: Clear Embossing Powder, Heat Tool, Scallop Circle, 1 3/8" Circle, 1" Circle Punches, Dimensionals, Snail Adhesive, Stamp-a-ma-jig, More Mustard Marker We stamped off the Hello Doily on the background of the First Edition Paper with Wisteria Wonder, then stamped the stem in Old Olive. The flowers were stamped with the Wisteria Wonder on a scrap of Very Vanilla, then Stamp-a-ma-jigged with the second stamp in Concord Crush. The flower centers were colored

Happy Stampin'!

Image
What a fun afternoon of stamping we had! Katie had gotten a couple of the birthday calendars to make for Christmas gifts and hadn't had a chance to finish them, so she worked on those, and Nina, Dickson's sister and I made some cards. What fun to stamp with someone that hasn't done any stamping before! Nina's a natural and picked it up really quick. We're going to try to get more cards done before she leaves to go with the birthday calendar that Katie is making her. I did get a chance to play with some of the new "toys" that came earlier and I love, love, love them! Here's the card that I put together yesterday and this morning with my favorite set from the new mini called Take It to Heart. I used the design in the catalog as a starting point, so that made this card really easy to figure out. The best thing about this set too is that I got it FREE for having a workshop. How much fun is that!?  I love this bird image and the new Pleated Satin Ribbon and

The Stockings were Hung (and finished!)

Image
Oh what a great Christmas we had! We had such a fun trip to Disneyland and San Diego! We spent 3 days at Disney, then off to San Diego to Sea World and the San Diego Zoo, and my favorite...the OCEAN!! We walked for miles and miles and came home happy and totally exhausted! While at Disney, Larry and I celebrated our 35th anniversary with a special dinner at the Blue Bayou Restaurant (the one that you pass while riding the boats through the Pirates of the Caribbean...our favorite ride!). What a special night! Then off to San Diego and Sea World and a nice long walk along the ocean. What special memories! 35 happy years together! Katie and Dickson surprised us with reservations made for us at the restaurant. What a great Disney adventure! The lights at Disney are always so spectacular! The lines were long, but so worth the wait. The boys loved the roller coasters and of course, one of the favorites...Splash Mountain! No, that's not any of us surfing...just a cool shot I captured

Merry Christmas Stocking

Image
I ran out of cards again, so had to do some quick and easy ones for my last minute sending. I love the simplicity of these and they went together so quickly! Just what I needed this time of year! Ingredients: Stitched Stockings, Inside sentiment from Come to Bethlehem Ink: Not Quite Navy Paper: Not Quite Navy, Whisper White Accessories: Jewels, Organza Ribbon, Northern Flurries Embossing Folder, Big Shot, Stocking Punch, Snail Adhesive, Dimensionals Inside I stamped the Merry Christmas and the stocking again in Not Quite Navy. Really a simple card, but fun to do! Check out the clearance rack online! Up to 80% off on Stampin' Up! They have some of the old whale style punches on clearance (my favorite kind of punch!) and lots of really good deals! Order on-line and have it shipped right to you! Just click on the button on the top left and it will take you right to the page...set up an account and you're ready to roll! What fun! Great prices! Check them out! I've gotten my

Frosty and Rudy

Image
Tis the season...for being BUSY! I love the hustle and bustle of the holiday season and all the preparations and surprises! I'm in the process of helping Katie make quilted stockings for all of Dickson's family that are coming, getting shopping done, presents wrapped and mailed, cards finished and more cards made, and preparing for our trip to Disneyland! WOW! Can't wait! Then to top it off, Katie and I are taking a cake decorating class at our local Joanne's store with classes on Tues and Thurs nights. We've finished 2 lessons so far, and boy, have I learned a lot about cake baking and decorating! Here's a picture of our first cakes... Katie made the cupcake one and I made the fish one. My poor cake had the eye squished on the way home, so my fish just wasn't seeing right! Sure tasted better than most fish though! Not too bad for rookies, right? Holly, who is teaching the class has a cake business and has been so kind to share all her knowledge with us...

The Perfect Bag

Image
The Perfect Bag This tutorial came from demonstrator Jan Farring that she learned at the Stampin’ Up! Convention in 2008, and with it, you will be able to recreate your own bags for the holidays. They are fast and can be made in any size or shape for the perfect gift! WARNING!   I’ll caution you right now, these can be very addicting! Once you get started you won’t want to stop! Here’s a picture of some of them that I made… For the largest bag, you need 2 pieces of 12 x 12 Designer Series Paper of the same design. Score both sheets of the paper at 2” on three sides and 1 ½” on the top side. This is so easy with the Simply Scoring tool! Lay your paper on your scoring tool with the side that you want to be the front of the bag pointed up.   If your paper has a direction to it, make sure that the design is going the right way. Fold and crease the top 1 ½” of both 12 x 12 sheets to the front side of your paper and adhere with Snail. Crease all score lines with your bone folder. Add sti

Wrap it Up!

Image
Wrap it up with these simple, fun tags! I had so much fun making these! The Two Tags Die, the new Peekaboo Frames Die, and the Circles and Scallops all cut with the Big Shot make it super simple and fast! I used an assortment of punches, lots of  paper scraps, and stamps to put them all together.                                                    This one looks like an ornament!                                    The Dasher stamp is embossed in silver and the scallops are the new silver glimmer paper. It's so sparkly in real life! A little piece from the Top Note Die adds a little color and makes it pop! The glimmer paper in red was used to give it lots of bling! The flowers and leaves are punched with the 5 Petal Punch. So easy!! This one is made with the Peekaboo Frames Die. I stamped the image on the front, then stamped it again on the inside window and stamped the to, from over the top of the lighter image. Love it! Peekaboo! Hope this gives you some ideas for easy to do

It's Beginning to Look a lot Like Christmas!

Image
With Thanksgiving come and gone, the lights and the tree have gone up and the decorations set out. It really does look a lot like Christmas around here! I love this time of year and the anticipation and excitement of Christmas! I have spent the last couple of days stuffing envelopes and writing little notes with all the cards I have finished and they're going to the post office today! It feels so good to be done this early and I made almost twice as many as I usually do. Accomplishment! YEAH! I'm so excited too for our last class before Christmas called Wrap it Up! I've had so much fun designing the projects. The only hard part is knowing when to stop! I really must warn you ahead of time...some of these projects can be addicting! Before I share those though, I'm going to share the last Christmas card that I did. I was short about 15 cards, so wanted something that was quick, easy, and beautiful. A fellow demonstrator, Dawn Olchefske shared this card on our Stampin

Happy Thanksgiving

Happy Thanksgiving! I've so many blessings to count and thank God for, and  among those blessings are you, .my stampin' friends! Thank you for being part of my life and joining me here on my blog to stamp along with me. Thank you for encouragement and kind words. I sure miss stamping in person with you, but so thankful that we can do it "together" here! Blessings to all of you on this day set aside to thank the Lord for all that He has given. Enjoy your day, your turkey, your family and friends! Happy Thanksgiving!! Lauri                    

Online Extravaganza!

Image
Shop online from the comfort of your home and save time and money!  Log into my Online Store on Monday, November 21, to take advantage of great savings, like FREE digital downloads valued at $40 when you buy My Digital Studio Express, 60 percent off select Designer Fabrics, and 30 percent off an exclusive ribbon bundle! In addition, there will be two items on sale for 24 hours only (November 21, 12:01 AM - 11:59 PM [MT])-so make sure you don't miss the first 24 hours of Online Extravaganza! Log in early and take advantage of the sale!! And… be sure to stay tuned for more surprises and online shopping deals throughout the week, as the Online Extravaganza Event at continues through Wednesday, November 30th! Click Here to Order

Mini Scrapbook

Image
I love, love, love this old pattern! I had forgotten about it until Katie found the one she made several years ago in her scrapbook stuff last weekend. I decided to resurrect the pattern and do it for our scrapbook workshop tomorrow. I had learned how to make this little mini album at the Stampin' Up! convention several years ago and still love it today! I don't know about you, but I take tons of pictures! I usually print some of them in wallet size (two for the price of one!) then can use them to add smaller prints to my layouts, or like I did here, punch them into smaller photos. I used 23 pictures in this little mini scrapbook! That would have been a whole roll of film back in the "old days"! WOW! The mini book can be added to a page as an interactive scrapbook piece, or just carried along with you to show off those cute grand kids! Mine is going to end up on a scrapbook page with all the other pictures that I took!! I do love to take pictures! Here's a pictu

Monkey Business

Image
A friend sent me this recipe a couple of weeks ago and we loved it so much that I wanted to include it in my recipe book. I'm also in the process of making a couple more books for gifts and will also share this recipe page for our scrapbooking workshop this weekend. So without anymore monkey business, here it is: Isn't he cute?? I had problems finding any directions for a cute monkey, so copied a monkey picture on Michael's bib. (I'd show you a picture of it, but he got it pretty messy last night...he's started on cereal!). Katie just laughs at me! Here's a close up of the monkey... Here's the punches that I used: Face 2 1/2" circle punch, muzzle (I guess that's what you call it??) Extra Large Oval Punch, Black eyes 1/2" circle punch, behind the eyes (don't know what that's called either...sockets??) Full Heart Punch, Ears 1 1/4" circle punch and 1" circle punch, nose is a  trimmed 1/2" circle punch , and his stickin&#