Mini Scrapbook
I love, love, love this old pattern! I had forgotten about it until Katie found the one she made several years ago in her scrapbook stuff last weekend. I decided to resurrect the pattern and do it for our scrapbook workshop tomorrow. I had learned how to make this little mini album at the Stampin' Up! convention several years ago and still love it today! I don't know about you, but I take tons of pictures! I usually print some of them in wallet size (two for the price of one!) then can use them to add smaller prints to my layouts, or like I did here, punch them into smaller photos. I used 23 pictures in this little mini scrapbook! That would have been a whole roll of film back in the "old days"! WOW! The mini book can be added to a page as an interactive scrapbook piece, or just carried along with you to show off those cute grand kids! Mine is going to end up on a scrapbook page with all the other pictures that I took!! I do love to take pictures!


Here's a picture of it opened up...

The 12 x 12 sheet is folded in 1/2, then in half again, then opened up and each section folded toward the middle. You should end up with 4 sections that are 3" x 6", and make a W when you're looking at it from the side with the bottom a closed fold and the top open to slide your cards into. I used my bone folder to make sure I had nice, crisp folds (and straight!).

The tags were cut 5 7/8" x 2 3/4" so that they could slide easily out of the pockets. The pullout at the top of each tag was punched with the Round Tab punch, attached with some of the sticky strip, then a small circle punch and ribbon tied through it.
I added pictures to both sides of the tags too...

A close up of the tear along the left side from the fold of the next section, down about 1/2 way, and the punch with the 1 3/8" circle punch in the top of the second section. I added another matching piece from the Spice Cake DSP to that section too (cut 3" x 6").

The third and fourth sections are cut about 3" down along the fold line between them. The third section folded over and brads attached, the the fourth section folded down, then a small fold toward the top again and torn. I added a little adhesive to that fold to make it stay in place. Open up the whole paper to attach the brads, using the mat pack to keep them straight, then add a piece of sticky strip along both outside edges as close to the edge as possible to keep it all together. (Section 1 and section 4). You don't need to add any adhesive between the other sections as the folds will keep the pullouts in place.

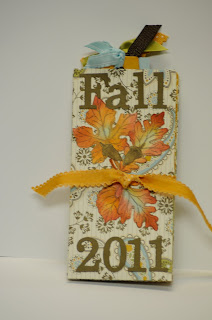
Now you're ready to add as many pictures as you'd like along with stamped images to go with your theme of your pictures. I used the Gently Falling set from the Holiday Mini Catalog. The leaves were stamped with the outline images in Early Espresso, then sponged with different colors and cut out. The letters on the front are Soft Suede and cut with the Big Shot and my Timeless Type Jr Alphabet. All done! It goes together really fast and so impressive when you're done! What a great way to share those holiday memories, or make for someone special on your list. How about like the scrapbook page I did last weekend...10 things I love about you, or Lessons I've Learned from my Dad, or just a time like I did, Fall 2011. There's so many things you can do with this little scrapbook! And you don't even have to be a "scrapbooker" to enjoy doing it! Don't hesitate to contact me if you need further directions. Faith and I made this one up in just a couple of hours while we were watching the owl that visited us yesterday in a tree right by the back deck. He stayed all day, and we spent more time watching him than really working! So beautiful and fun to watch! We didn't let our little dog, Riggley out all day without us... just in case the owl wanted a little snack! Ha!

Isn't he beautiful?
Happy Scrappin'!!
Lauri


Comments
Post a Comment
I love to hear your comments! Thanks for stopping by!