The Perfect Bag
The Perfect Bag
This tutorial came from demonstrator Jan Farring that she learned at the Stampin’ Up! Convention in 2008, and with it, you will be able to recreate your own bags for the holidays. They are fast and can be made in any size or shape for the perfect gift!
WARNING! I’ll caution you right now, these can be very addicting! Once you get started you won’t want to stop!
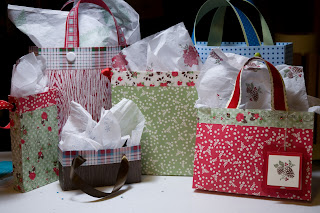
Here’s a picture of some of them that I made…
For the largest bag, you need 2 pieces of 12 x 12 Designer Series Paper of the same design.
Score both sheets of the paper at 2” on three sides and 1 ½” on the top side. This is so easy with the Simply Scoring tool! Lay your paper on your scoring tool with the side that you want to be the front of the bag pointed up. If your paper has a direction to it, make sure that the design is going the right way. Fold and crease the top 1 ½” of both 12 x 12 sheets to the front side of your paper and adhere with Snail.
Crease all score lines with your bone folder.
Add sticky tape on one 2” side along the edge and along the score line. Match up the seams and adhere together. Add sticky strip to the other side of the bag, making sure your seams are facing the same direction (toward the back of the bag). Adhere together.
Turn the bottom side up and fold in both sides (like you’re wrapping a gift package). Line up the seams with the 2” fold. Put sticky strip on each of the sides and fold over, reaching down into the bag to adhere the bottom pieces together. The bottom of your box should look like this…
Cut 2 pieces 11”x 1” of solid color card stock to match your bag, and 2 pieces of 11” x ¾” pieces of designer series paper to match. Adhere these together and using the
Crop-A- Dile, punch 2 holes 1/8” and apply the handles with brads. Be careful with the punch on the other side of the bag that you don’t punch through both sides at the same time with the other side of the Crop-A-Dile. (Don’t ask me how I know!) Faith has a little bag all her own…with a little extra hole on one side!
You can add ribbon, a matching tag, matching tissue paper and you have the perfect bag!
Here are some other sizes for you to make.
Cut 2 sheets 9x7 (the first measurement is the horizontal). Score all 4 sides at 1”. Finished measurement is 7”x5”x1”. This size is excellent for small photo albums, card sets, etc. (This is the size in the above picture). For the handles, I cut a piece of DSP to match my bag 9”x1” then added a piece of satin ribbon in the middle instead of another strip of paper. Don't you just love the matching tissue paper and tag?
Another size:
Cut 2 sheets 9”x9”. Score all four sides at 1”. Finished measurements are 7”x7”x1”. This size works well for Cd's, small books, etc. I used ribbon for the handles here.
And one more for small gifts:
Cut 2 sheets 8”x5”. Score 3 sides at 1 ½” and top side at 1”. The finished measurement is 5”x3 ½”x1 ½”. This one would work great for a small votive candle, treats, etc. Again I made the handles out of ribbon.
You can increase the width of the bag by ½” by adding 1” to the horizontal measurement and scoring at
1 ½” instead of 1”. Here’s one I turned the other direction to make it longer and narrower.
If you have any questions, please don’t hesitate to contact me. Having fun wrapping up your gifts in a perfect bag! Anyone need to join me for Bag Makers Anonymous??
Happy Stampin’!!
Lauri


Comments
Post a Comment
I love to hear your comments! Thanks for stopping by!