I'm back!
I know it's been a while, but it has been more than crazy around here!! I just don't know where the time goes! I really appreciate the time it takes to devote to the writing and photographing for blogs! They really can eat up a lot of time...time that I just haven't had. My grandkids, that we moved here to be near, have moved to Tucson, AZ (oh, how I miss them) and we have had to find a new place to live. What a job that has been! We have moved in with some friends for now, and Loretta loves to stamp too! We've been working on her new crafting space and finding just the right place for everything! I have been making and crafting and scrapbooking and designing projects for my clubs, but have just not had the time to photograph all of them and post them here. I will try to do some catch up!
This first project is one that I made with the Stampin' Up! fabric. I found a picture of these on Pinterest and the demonstrator that made them was kind enough to share the pattern with me. I made them and gave them as gifts (from the Scrappin' Fairy) to the gals that were at the scrapbook overnight that we had a few months ago. (Wow! How time flies!) I made a few extra and have used them for little gifts for hostesses and for my secret prayer person at church. I love the coordinating fabrics! I packaged them with a compact mirror and lotion that's available on the demonstrator web site and tied them together with a simple little bow. Another one, I made a little gift bag with DSP that I shared the pattern for back in December on this post. Fun and easy! A special way to give that little gift!
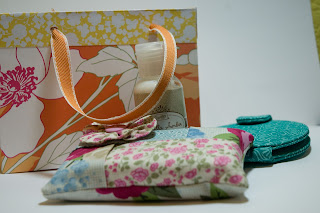


 Aren't they just the best for tucking into a purse or the glovebox of the car? I'm always in need of a tissue...especially with all the tears lately!


Here's another simple and fun project to tuck a little gift into for that special person.

I have shared these with the scrapbook and cardmaking clubs that we had a couple of months ago. These make such wonderful little table decorations...how about for Bunco? A secret Sister? A special tea? A luncheon? So many different ways you can use these. On one side, I put a tea bag and on the other, you could add a gift card, a small 3 x 3 note card, some money, etc. One of the gals at club suggested that they would be great for a Christmas dinner with a candy cane coming up out of the middle...and with that great Christmas paper in the new catalog! Fun!
Here's the pattern to make these:

Cut a piece of DSP 8 1/2" x 12". Score with the Scoring Tool along the 12" side at 1 1/4", 2 1/2", 5", 7", 9 1/2", and 10 3/4". The markers along the top edge of the scoring tool make it so handy to remember all those numbers!
Then flip the paper and score along the 8 1/2" side at 2 1/2" and 6".

Cut out the 2 1/2" square from each corner (you will cut across one of the score lines).

Fold each corner towards the center, then each of the short sides on score line into the center.


Turn over, fold along score line to form sides. Fold small flaps along tops down towards the V shaped pockets.


Punch with 3/8" hand punch and string ribbon through holes with cello bag cominp up through the middle to keep the bag closed. Add tea bag to one side, and small gift card or ntoe to the other side.


Starbursts!
Aren't they fun?!
One more quick card...another one of those Pinterest ideas...that I made for thank you cards for the orders from all the clubs. I think you can figure this one out without any instructions.


Hope your summer is going well...too fast here! Back to school time already for my grandkids in Colorado and Larry starts again soon too. Wow! I think that I've been moving all summer...both in SD and here! YIKES!
I'll be back tomorrow with some of the projects that I've been doing. I have some great cards from convention that I swapped and some awesome scrapbook pages! Can't wait to share them with you!
Happy stampin'!!
Lauri


Comments
Post a Comment
I love to hear your comments! Thanks for stopping by!